
Varnish is a versatile reverse HTTP proxy that caches responses from backend servers in memory so they are served quickly when requested again. It uses HTTP headers to determine whether to cache the responses to a particular request. By default, it does not cache responses with cookies because those are considered client-specific requests; however you can change this setting in the configuration file.
Besides acting as a caching server, Varnish can be used as a:
Web application firewall
DDoS attack defender
Load balancer
Quick fix for unstable backends
HTTP route
There are three locations where the HTTP cache can be saved:
In this tutorial, you will set up Varnish as a caching reverse proxy server. You’ll then test the setup with Varnish against a non-caching configuration using wrk
Prerequisites
To complete this, you will need:
One Ubuntu 20.04 server with at least 2 GB of RAM
A non-root user with sudo privileges as described in this Ubuntu 20.04 initial server setup guide
Step 1 — Installing Varnish And Apache
To start, you’ll install Apache and Varnish. First update apt-get, and then install Apache with these commands:
$ sudo apt-get update
$ sudo apt-get install apache2 –y
You’ll see output indicating that Apache is being installed.
After the Apache installation process is complete, install Varnish with this command:
$ sudo apt-get install varnish –y
You’ll see output indicating that Varnish is being installed.
Next, make sure both packages installed correctly. First, use this command to check the status of Apache:
$ sudo systemctl status apache2
The output will look similar to this:
Output
root@ubuntu-s-1vcpu-2gb-fra1-01:~# sudo systemctl status apache2
● apache2.service – The Apache HTTP Server
Loaded: loaded (/lib/systemd/system/apache2.service; enabled; vendor preset: enabled)
Active: active (running) since Wed 2021-08-04 18:58:39 UTC; 4min 10s ago
Docs: https://httpd.apache.org/docs/2.4/
Main PID: 2279 (apache2)
Tasks: 55 (limit: 2344)
Memory: 5.0M
CGroup: /system.slice/apache2.service
├─2279 /usr/sbin/apache2 -k start
├─2281 /usr/sbin/apache2 -k start
└─2282 /usr/sbin/apache2 -k start
Aug 04 18:58:39 ubuntu-s-1vcpu-2gb-fra1-01 systemd[1]: Starting The Apache HTTP Server…
Aug 04 18:58:39 ubuntu-s-1vcpu-2gb-fra1-01 apachectl[2278]: AH00558: apache2: Could not reliably determine the server’s fully qualified domain name, using 127.0.1.1. Set the ‘ServerName’ di>
Aug 04 18:58:39 ubuntu-s-1vcpu-2gb-fra1-01 systemd[1]: Started The Apache HTTP Server.
Press the Q key to exit the status command.
Next, check the status of Varnish with this command:
$ sudo systemctl status varnish
The output will look similar to this:
Output
root@ubuntu-s-1vcpu-2gb-fra1-01:~# sudo systemctl status varnish● varnish.service - Varnish HTTP accelerator Loaded: loaded (/lib/systemd/system/varnish.service; enabled; vendor preset: enabled) Active: active (running) since Wed 2021-08-04 18:59:09 UTC; 4min 41s ago Docs: https://www.varnish-cache.org/docs/6.1/ man:varnishd Main PID: 3423 (varnishd) Tasks: 217 (limit: 2344) Memory: 10.7M CGroup: /system.slice/varnish.service ├─3423 /usr/sbin/varnishd -j unix,user=vcache -F -a :6081 -T localhost:6082 -f /etc/varnish/default.vcl -S /etc/varnish/secret -s malloc,256m └─3447 /usr/sbin/varnishd -j unix,user=vcache -F -a :6081 -T localhost:6082 -f /etc/varnish/default.vcl -S /etc/varnish/secret -s malloc,256mAug 04 18:59:09 ubuntu-s-1vcpu-2gb-fra1-01 systemd[1]: Started Varnish HTTP accelerator.Aug 04 18:59:10 ubuntu-s-1vcpu-2gb-fra1-01 varnishd[3423]: Debug: Version: varnish-6.2.1 revision 9f8588e4ab785244e06c3446fe09bf9db5dd8753Aug 04 18:59:10 ubuntu-s-1vcpu-2gb-fra1-01 varnishd[3423]: Version: varnish-6.2.1 revision 9f8588e4ab785244e06c3446fe09bf9db5dd8753Aug 04 18:59:10 ubuntu-s-1vcpu-2gb-fra1-01 varnishd[3423]: Debug: Platform: Linux,5.4.0-73-generic,x86_64,-junix,-smalloc,-sdefault,-hcritbitAug 04 18:59:10 ubuntu-s-1vcpu-2gb-fra1-01 varnishd[3423]: Platform: Linux,5.4.0-73-generic,x86_64,-junix,-smalloc,-sdefault,-hcritbitAug 04 18:59:10 ubuntu-s-1vcpu-2gb-fra1-01 varnishd[3423]: Debug: Child (3447) StartedAug 04 18:59:10 ubuntu-s-1vcpu-2gb-fra1-01 varnishd[3423]: Child (3447) StartedAug 04 18:59:10 ubuntu-s-1vcpu-2gb-fra1-01 varnishd[3423]: Info: Child (3447) said Child startsAug 04 18:59:10 ubuntu-s-1vcpu-2gb-fra1-01 varnishd[3423]: Child (3447) said Child startsIf you do not see both services up and running, wait a few minutes until they are fully loaded, and keep both of them running.
Now that you have Apache2 Varnish, installed, you’ll give Varnish something to serve, in this case Apache’s static web page.
Step 2 — Configuring Varnish To Serve Apache’s Static Web Page
In the previous step, you installed Varnish, and next you’ll need to configure it. By default, Varnish listens on port 6081 and connects to a local web server on port 8080. You’ll change that to serve the Apache static site from Apache server.
First, you’ll change Varnish’s listening port to 8080. Usually you would want the listening port to be 80, but because you are running Apache and Varnish on the same server, you’ll use port 8080 for Varnish and port 80 for Apache.
There is no configuration option to change the listening port for Varnish, so you’ll do it using the command line. You’ll create a file called customexec.conf in a new directory called varnish.service.d in /etc/systemd/system/ that will change the default ports.
Use the mkdir command to create the new directory:
$ sudo mkdir /etc/systemd/system/varnish.service.d
Use your favorite text editor to create a new file called customexec.conf :
$ sudo nano /etc/systemd/system/varnish.service.d/customexec.conf
In customexec.conf, add the following content:
/etc/systemd/system/varnish.service.d/customexec.conf file
[Service]ExecStart=ExecStart=/usr/sbin/varnishd -j unix,user=vcache -F -a :8080 -T localhost:6082 -f /etc/varnish/default.vcl -S /etc/varnish/secret -s malloc,256mIn this file you are changing the Service section of the Varnish configuration. First you remove the old value for the ExecStart option, and then you assign a new value for it.
The new value specifies the binary file used to run Varnish with the following options:
-j: Specifies the jailing mechanism to use. Varnish jails are used to reduce the permissions for the varnish process over various platform-specific methods. Here you’re using the unix mechanism and the user vcache to limit the permissions. This is default for varnish on Ubuntu systems.
-F: Indicates that the server should run in the foreground, because systemd expects the main process to keep running so it can track it, and not fork a new process and die.
-a: This flag is used to specify the IP address and port for accepting client connections. The IP in this case is empty, which means the server will accept all IPs. The port is set to 8080.
-T: This flag specifies the IP address and port for management interface, in this case localhost and port 6082.
-f: This flag specifies the default VCL file for Varnish configuration. You will edit this file later in this tutorial to configure Varnish to connect to the Apache server.
-S: This flag specifies a shared secret file for authorizing access to the management interface. The /etc/varnish/secret value is the default for Varnish on Ubuntu. You will not use the secret file in this tutorial.
-s: This flag indicates where and how to store objects. The value malloc,256m is the default one for Vanish. It means to store various Varnish objects in memory using the malloc system call and a maximum size of 256 megabytes. Other possible values are default, which uses umem when malloc is not available, or file, which stores objects in a file on the disk.
Save and close the customexec.conf file. Then execute this command to reload the systemd services file from disk:
$ sudo systemctl daemon-reload
Then restart Varnish for changes to take effect.
$ sudo systemctl restart varnish
You won’t see any output from these last two commands. To make sure that Varnish is now listening on port 8080, use the netstat command to display all listening TCP sockets on the server.
$ sudo netstat -ltnp | grep 8080
You’ll see output that looks like this:
Output
tcp 0 0 0.0.0.0:8080 0.0.0.0:* LISTEN 18689/varnishdtcp6 0 0 :::8080 :::* LISTEN 18689/varnishdNow that Varnish is running and listening to port 8080, you need to edit the default configuration file located at /etc/varnish/default.vcl:
$ sudo nano /etc/varnish/default.vcl
Navigate to the backend default block, and then change .port to 80, as shown here:
default.vcl file
# Default backend definition. Set this to point to your content server.backend default { .host = "127.0.0.1"; .port = "80";}Save and close the default.vcl file, then restart Varnish with this command:
$ sudo systemctl restart varnish
If everything is fine, there won’t be any output. Open in your browser, and you’ll see the Apache static site, opened using Varnish.
You now have Apache and Varnish running together on the same Droplet, with Apache listening to port 80 and Varnish to port 8080. Next, you’ll compare the response times of both servers using the wrk tool.
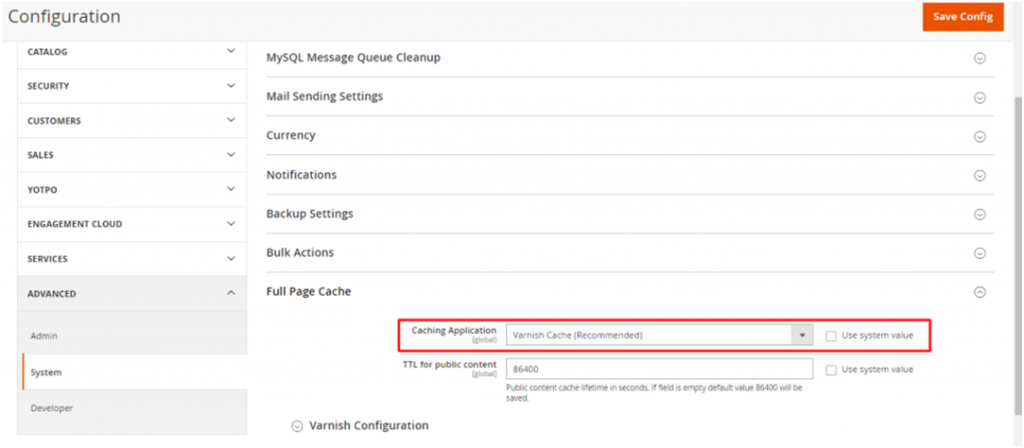
Step 4: Configure Magento to use Varnish
To configure Magento for using Varnish, you need to enable Full Page Cache. Please go to Stores > Configuration > Advanced > System > Full Page Cache, you will see the below image:
Enable Full Page Cache
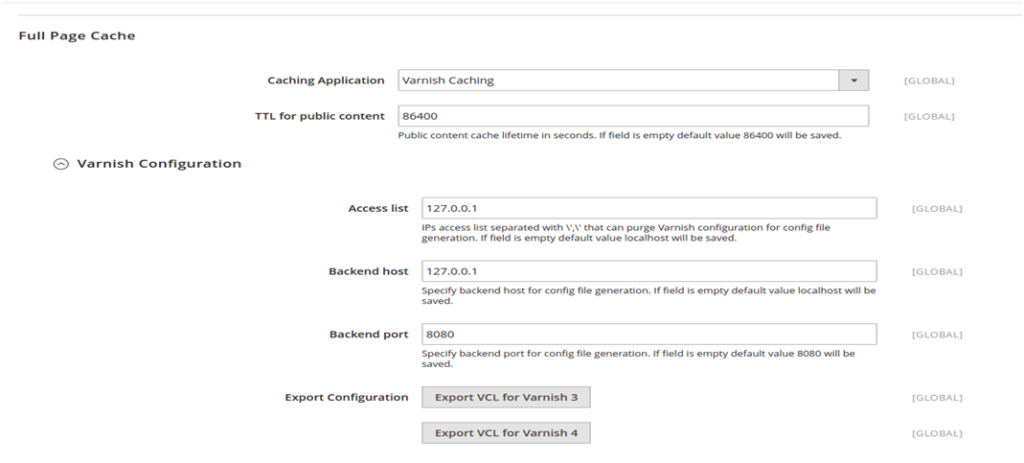
Then, choose Varnish Cache from the Caching Application list.
Caching Application
Next step, you can change the value in TTL for public content field by increasing or decreasing the lifetime value of the public content cache if you want.

for public content
Afterward, by expanding the Varnish Configuration and entering the following details, you can enable advanced options.
Determine the IP or Host that is allowed to delete the Varnish Cache in the “Access list”. Then, please add your domain name of the application in this field.
Determine the Backend Host.
Backend Port is the port of the Apache server.
Define the Grace period to know the time Varnish servers stale content suppose the backend is not responding.
Finally, please click on the Save Config button if you are done. Another way to enable Magento 2 Varnish, you can do it through the command line interface via SSH. If doing this way, please use the following commands:
bin/magento config:set--scope=default--scope-code=0system/full_page_cache/caching_application 2How to Verify Varnish in Magento 2
Check suppose Varnish is listening to port 80
To check if Varnish is listening to port 80, please run the command below:
netstat -tulpn | grep varnished

Verify Varnish in Magento 2
2. Verify your contents in var/cache, var/page_cache folder is not recreated
Once FPC is cleared, cache folders (var/cache, var/page_cache) should be empty because FPC is set up to serve the content from Varnish.
Final words
To sum up, integrating Varnish Cache in Magento 2 is an ideal solution for your online store if you want to instantly reduce the page load time and increase the page load speed. Thanks to this integration, your website will not only enhance the user experience, but it also helps boost sales dramatically. Only with some minimal changes can you beautify your online business quickly.
If I have missed any key points related to this topic, or you have any contribution to any documentation for our blog, please feel free to comment below.
Thank you for reading!